Secure Your Free In-Person Estimate
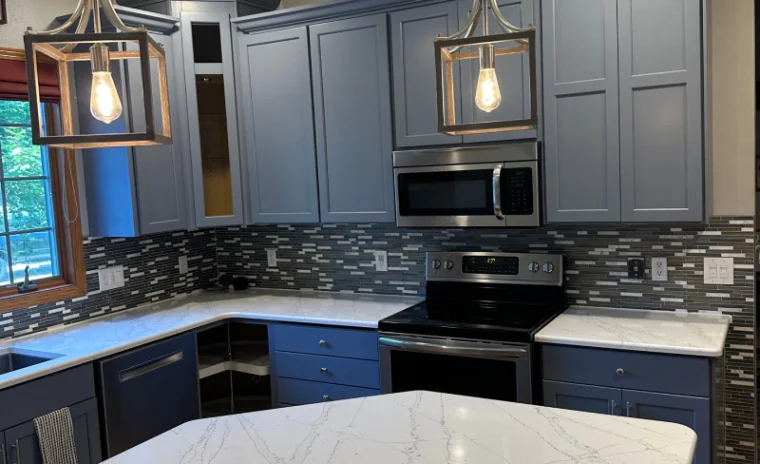
Achieve Professional Results Without Replacement
What Cabinet Refacing Is and Why It Works
Cabinet refacing is a cost-effective kitchen renovation service that updates the visible surfaces of your existing cabinets without replacing the entire structure. The process involves applying new veneer or laminate to the cabinet frames, installing new doors and drawer fronts, and adding updated hardware. The cabinet boxes themselves remain in place, which saves time, reduces waste, and typically costs 40 to 60 percent less than full cabinet replacement.
Homeowners in Appleton and Green Bay choose this cabinet modification service because it delivers a dramatic visual transformation in a matter of days rather than weeks. If your cabinet boxes are structurally sound but the doors are outdated or the finish has worn thin, refacing offers an ideal solution. This approach preserves the existing layout while allowing you to select from modern finishes, door styles, and hardware that reflect current design trends.
The environmental benefits are also considerable. By retaining the cabinet frames, refacing generates significantly less construction debris than a full tear-out. For Wisconsin homeowners who value sustainability, this cabinet renovation service represents a responsible choice that reduces landfill waste while still achieving a fresh, updated appearance. Additionally, because the project involves less disruption, your kitchen remains partially functional throughout the process, which is particularly valuable for families who rely on daily meal preparation at home.
Evaluating Your Cabinets and Selecting Materials
Before beginning any kitchen cabinet refacing project, you must determine whether your existing cabinets are suitable candidates. Open each door and inspect the cabinet boxes for signs of water damage, warping, or structural weakness. Pay particular attention to cabinets beneath the sink or near dishwashers, as moisture exposure can compromise integrity. If the boxes are solid, level, and free from significant damage, refacing is a viable option. However, if you notice sagging shelves, broken joints, or soft spots in the wood, replacement may be the more prudent long-term investment.
Once you have confirmed structural soundness, accurate measurements are critical. Record the dimensions of each cabinet door, drawer front, and exposed frame surface. Include the thickness of the existing doors and note any unique features such as glass inserts, angled corners, or specialty storage solutions. In older homes throughout the Fox Valley region, cabinet dimensions can vary slightly from standard sizes, so precise measurements ensure that new doors fit properly and function smoothly.
Material selection is where your design vision takes shape. For door styles, you can choose from raised-panel, flat-panel, shaker, or contemporary slab designs in wood, medium-density fiberboard, or thermofoil. Frame veneers are available in real wood species, laminate, or rigid thermofoil, each offering different durability and maintenance characteristics. Wisconsin’s seasonal humidity fluctuations make real wood veneer particularly appealing for its ability to adapt gradually to changing conditions, though high-quality laminates also perform well when properly installed. Hardware choices, from brushed nickel to oil-rubbed bronze, complete the transformation and should complement both the new door style and your overall kitchen aesthetic.
Preparing Your Space and Removing Cabinet Components
Proper preparation sets the foundation for a successful refacing project. Begin by removing all items from your cabinets and clearing countertops. Protect your flooring with drop cloths or heavy cardboard, and cover appliances and countertops with plastic sheeting secured with painter’s tape. If you plan to continue using your kitchen during the project, designate a temporary prep area in an adjacent room where you can store essential items and perform basic meal preparation.
The removal phase requires methodical attention to detail. Start by photographing each cabinet door in place, labeling it with painter’s tape that indicates its location. Use a cordless drill to remove hinges, keeping all screws organized in labeled bags or containers. Remove drawer fronts by unscrewing them from the drawer boxes, which typically remain in place throughout the refacing process. Next, unscrew and remove all existing hardware, including knobs, pulls, and any decorative trim pieces. If you encounter stripped screws or stubborn hardware, penetrating oil and patience will usually resolve the issue without damaging the wood.
Once doors and hardware are removed, inspect the exposed cabinet frames for any damage that may have been hidden. Fill small holes or dents with wood filler, allow it to dry completely, and sand smooth. Clean all frame surfaces thoroughly with a degreasing cleaner to remove cooking residue, which is particularly important in homes where frequent frying or baking occurs. This step ensures that new veneer or laminate will adhere properly and deliver a long-lasting bond.
Applying New Surfaces and Installing Doors
Applying veneer or laminate to cabinet frames is the most technically demanding phase of the refacing process. If you are using peel-and-stick veneer, cut each piece slightly larger than the surface it will cover, allowing for precise trimming once applied. Start with the least visible surfaces to develop your technique before moving to prominent areas. Press the veneer firmly into place, working from the center outward to eliminate air bubbles, and use a roller or wooden block to ensure full adhesion. Trim excess material with a sharp utility knife, holding the blade at a slight angle to create a clean edge that sits flush with adjacent surfaces.
For rigid thermofoil or laminate applications, contact cement is typically required. Apply a thin, even coat to both the cabinet frame and the back of the material, allow it to become tacky according to the manufacturer’s instructions, and then carefully position the material before pressing it into place. This method provides exceptional bond strength but allows no room for repositioning, so accuracy during initial placement is essential. Professional cabinet refacing service providers often use this technique because it delivers a seamless, durable finish that withstands daily use for many years.
Once frames are complete, install the new doors and drawer fronts. Attach hinges to doors first, then position each door on its corresponding cabinet and mark hinge screw locations on the frame. Drill pilot holes to prevent splitting, then secure hinges with screws. Adjust hinges as needed to ensure even spacing and smooth operation. Install drawer fronts by aligning them carefully on the drawer boxes and securing them from the inside. Finally, attach new hardware at consistent heights and spacing, using a template or measuring tool to maintain uniformity across all cabinets. This attention to detail separates a professional-looking result from an amateur attempt. If precision installation feels overwhelming, a professional cabinet refacing contractor can ensure that every door hangs perfectly and every hinge operates smoothly.
Finishing Touches and Maintaining Your Investment
After all doors, drawer fronts, and hardware are installed, conduct a thorough inspection of your work. Open and close each door to verify smooth operation and proper alignment. Check that all hardware is tight and that drawer fronts are level. If any doors require adjustment, most modern hinges feature built-in mechanisms that allow you to fine-tune positioning without removing the door entirely. Take time to make these small corrections now, as they significantly impact both appearance and functionality.
Clean all surfaces with a soft cloth and a cleaner appropriate for your chosen finish. Wood surfaces benefit from furniture polish, while laminate and thermofoil require only mild soap and water. Remove any adhesive residue, fingerprints, or dust that accumulated during installation. Reinstall any decorative molding or trim pieces that were temporarily removed, and caulk any gaps between cabinets and walls or countertops for a polished, finished look.
Long-term maintenance of refaced cabinets is straightforward but important. Wipe up spills promptly, especially near the sink and stove where moisture and grease can accumulate. Avoid harsh abrasives or solvents that can damage the finish. In Wisconsin’s climate, where indoor humidity levels drop significantly during winter heating season, consider using a humidifier to prevent excessive drying that can cause wood veneer to crack or laminate edges to lift. Periodically tighten hardware and hinges, as normal use can cause screws to loosen over time.
If you invested time and effort into refacing your cabinets yourself, you likely discovered that achieving a truly flawless finish requires patience, precision, and specialized tools. For homeowners who prefer guaranteed results without the learning curve, professional cabinet refacing service offers the advantage of experienced installation, access to premium materials, and workmanship warranties that protect your investment. Whether you choose to tackle the project yourself or work with professionals, properly refaced cabinets can provide decades of reliable service while transforming your kitchen into a space you are proud to use every day. Contact us for a free assessment to see if your cabinets are ideal candidates for refacing and to explore the design possibilities available for your home.